Week 5 [Fri, Feb 3rd] - Project
iP:
- Generate a new JAR file
- Write some full commit messages
- Add Increments as PRs:
A-Assertions,A-CodeQuality,A-Streams - Add Increment:
A-CI - Add an extension
tP:
- Brainstorm user stories before the tutorial
- Choose user stories for v1.2 before/during the tutorial
iP
1 Generate a new JAR file
- Generate a new JAR file using Gradle (Gradle can bundle the JavaFX third-party library into the jar file. If you do not bundle JavaFX with the JAR file, the application will not work in computers that don't have JavaFX installed). Refer to the Gradle tutorial @SE-EDU/guides to find how.
If the.jarfile is smaller than 5MB, most likely JavaFX libraries are not inside it. - There is no need to create a release in GitHub with this jar file (although you are welcome to).
2 Write some full commit messages
- While we do not require you to write full commit messages (i.e., including a message body) in the work done in this module, it is still good to learn how to write such commit message. The purpose of this task is to give you some practice in writing such full and well-written commit messages.
- Requirements:
- Write full commit messages for at least 2-3 commits that you push this week.
- Follow these Git conventions for the commit message body as specified by @SE-EDU/guides when writing them.
- Git tag one of those commits as
A-FullCommitMessage.
3 Add Increments as PRs: A-Assertions, A-CodeQuality, A-Streams
- Note how to merge PRs:
- Practice using parallel git branches and PRs, as explained below:
- First, do each increment as a parallel branch (follow the branch naming convention you followed earlier
branch-Level-8etc.), but do not merge any. - Then, push each branch to your fork, and create a PR within your fork (i.e., from the increment branch to the
masterbranch). Be careful not to create a PR to the upstream repo. If you did create such a PR by mistake, no worries, just close it yourself.
- Now, merge one of the PRs and update the remaining PRs accordingly, as given below:
- Merge one of the PRs on GitHub. Remember to choose the
Create merge commitoption when merging. - The above step will cause the
masterbranch of your local repo to fall behind that of your fork. Therefore, you need to sync the localmasterwith the remotemasterbranch. One way to do that is to switch to the localmasterbranch and then pull the the updatedmasterbranch from your fork e.g.,git checkout master git pull origin master - Note how the remaining un-merged branches are no longer in sync with the latest
master. To rectify, merge themasterbranch to each of them. Resolve merge conflicts, if any. - Push the updated branches to your fork. The PRs will update automatically to reflect the updated branch.
- As before, tag the merge commit in the master branch and push the tag to your fork.
- Merge one of the PRs on GitHub. Remember to choose the
- Merge the remaining PRs using a procedure similar to the above.
4 Add Increment: A-CI
- We recommend that at least one member of the team attempt the following.
5 Add an extension
- Add at least one extension of your choice, selected from category B, C, or D i.e., pick just one item from one category e.g.,
B-DoWithinPeriodTasksorC-SortorD-Places - Recommended to add the extension via a branch (branch name is up to you). Optional to add it via a PR.
- Add a tag named
BCD-Extensionto the corresponding commit.
Discuss with your team members to ensure that each member picks a different extension.
You may want to pick an extension that is potentially relevant to your tP so that the code can be reused in the tP later, if possible.
tP: Gather requirements
1 Brainstorm user stories before the tutorial
Learn the recipe for brainstorming user stories in the textbook → Specifying Requirements → UserStories → Usage.
Also learn about brainstorming and user stories.Follow the steps in the recipe mentioned above to arrive at user stories for the the product, with your team members. If you didn't attend the lecture, please watch the lecture recording to learn more about this step.
Not following the recipe mentioned above could result in a different set of user stories than otherwise.User stories for what version? At this stage, collect user stories to cover at least the final version you hope to deliver at the end of the semester. It is OK to go even beyond that (reason: we are simulating a project that will continue even after the semester is over).
Do not omit user stories already covered by the features in AB3 i.e., the user story should be recorded even if AB3 already caters for it.How many user stories? Aim to collect more user stories than you can deliver in the project. Aim to create at least 30 user stories. Include all 'obvious' ones you can think of but also look for 'non obvious' ones that you think are likely to be missed by other competing products.
User stories of what size? Normally, it is fine to use epic-level user stories in the early stages of a project but given this is a small project, you may want to define smaller user stories (i.e., small enough for one person to implement in 1-2 days).
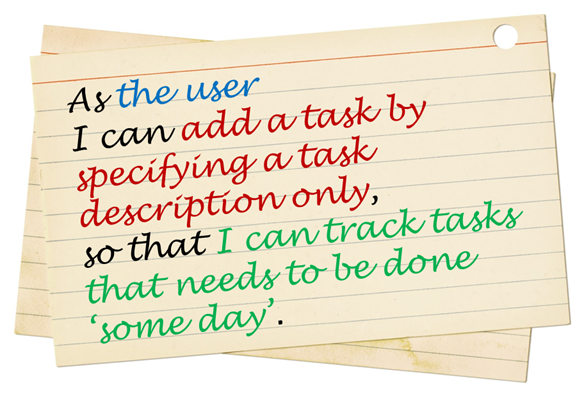
- Bad As a user, I can track my schedule, so that I can know when to do things.
Reason: too big, as track can involve a lot of things. - Good As a user, I can add a time to a task, so that I can record when a task need to be done.
- Good As a user, I can see the pending task that has the next earliest deadline, so that I can know what I need to do next.
- Bad As a user, I can track my schedule, so that I can know when to do things.
What format?: You may use a sentence format or a table format but do maintain the prescribed three-part structure of a user story. In particular, try to include the benefit part in most user stories as that will come in handy when prioritizing user stories later.
Submission (to be checked by the tutor later):
- Intermediate steps (e.g., persona, scenarios): Keep records these in your collaborative project document started in the previous week.
- Brainstormed user stories: Record them using an online tool (some examples given in [Textbook Specifying Requirements → UserStories → Usage → (panel) Tool Examples ]).
If you choose to use the GitHub issue tracker to manage user stories, you need to set up your team's GitHub organization, team repo, and its issue tracker first. Instructions for doing those steps are in the panel below.
2 Choose user stories for v1.2 before/during the tutorial
Project planning, with a twist
Intuitively, you might think the right thing to do is to decide what features will be in v1.4 and then plan the intermediate versions based on that. But that's not what we are going to do.
Why? Given the difficulty of reliably estimating the effort each feature will need, any such long-range plan is likely to be inaccurate.
Instead, what we will do is to assume the current iteration is the last iteration, plan that iteration to deliver the product (based on available time), and try to follow that plan as best as we can. After the iteration is over, we plan the next iteration as if it's the last iteration. But that time, you can factor in the experience from the previous iteration to do a better job of planning.
How is that better?
- Shorter-term plans have a better chance of being accurate and doable.
- You get multiple clean shots at project planning. Each try can learn from the previous tries. Hence, more learning.
- As each iteration produces a working product, you always have a working product, which practically eliminates the risk failing to deliver a working product by the final deadline.
The goal of this activity is to come up with the smallest possible product that is still usable so that it can be implemented as v1.2, to be delivered at the end of the first project iteration. We try to make it small because you will have only two weeks to implement v1.2 and coding as a team is a lot harder than writing code alone.
Why v1.2 and not v1.1? v1.1 is a mere documentation update only. v1.2 will be the first version that contains functionality changes.
Do not discuss features, UI, command format, or implementation details yet. That would be like putting the cart before the horse. At this stage we are simply trying to choose which user needs to fulfill first.
- If the product can be of some use without a given user story, that user story should be left out of v1.2, even if the omission makes the product hard to use, as long as the product is not impossible to use e.g., in most cases a product can be used without an 'edit item' feature because the user can always delete an item and add a new item instead of editing an existing an item.
- Don't worry about v1.3. You can design v1.3 after v1.2 done.
- Don't worry about v1.2 being 'too small'. You can always add more features to v1.2 if you finish it ahead of schedule.
You can also select an additional set of user stories that are nice-to-have in v1.2, to be done but only if there's time left. - If possible, narrow the scope of v1.2 further e.g., narrower target user, a smaller value proposition.
Suggested workflow:
- First stage:
- Divide the user stories among team members.
- Each member will go through their user stories to discard (e.g., cross out, or move to a different location, but not delete) which are definitely not needed for v1.2.
- Second stage:
- All members discuss the remaining user stories (i.e., the ones not discarded in the first stage), and try to trim the list further.
FAQs
Q: What if the chosen user stories for v1.2 is not enough to do a meaningful work division among team members?
A: In that case, you can add more user stories until there is enough for a meaningful work distribution.
Q: Should we omit user stories that are already supported by AB3?
A: No, you should still include them. Reason: The existing implementation might still require some work before it fits your product.